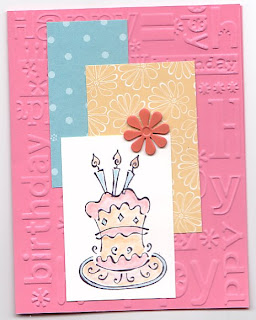
CPS put up another template and I decided to give it a try. However, with a sleeping puppy downstairs I needed to do things very quietly - which means no eyelets, nothing needing the heat tool or anything else that would wake him up. Here is the very simple card that I came up with:
My favorite thing abou this card is the embossing done on the background. I have seen people using these Cuttlebug embossing folders and been very jealous that I don't have a Cuttlebug. That is until this week when I was actually checking out the embossing folders at Michaels. It just so happens that they work in my Sizzix!!! Although by the looks of it the Cuttlebug is better - I really can't get another $80 die-cut machine - but now I have learned that I don't need to in order to use their oh so cute stuff! Yay!!!
The other things that went into this card are some of the Petals & Paisley Paper and a retired set that I have called Something to Celebrate. The cake was colored with Pastels and a Blender Pen. Then I added another one of those really cute flower-shaped brads that I bought at Michaels.
As time passes and Colby gets more used to us here (and housebroken) I hope to have more time to make cute things for the blog. Happy Stamping!
Thursday, April 26, 2007
Saturday, April 21, 2007
Templates
There is another blog out there that gives ideas for card templates, then people make cards that fit the template and email them in to whoever it is that manages the blog. The blog is CPS (Card Positioning Systems - not sure who came up with that name). Some of the templates I feel only so so about - but this one I wanted to give a try so I did 2 cards for CPS#9 (not that I sent them in - but I still did them).
This one uses some of my favorite designer series paper - Petals & Paisley (in the current Spring mini). I used stamps from two different stamp sets - Springtime Stems (a current hostess set) and All-Year Cheer II (retiring at the end of June and 20% off until the end of April).
Then I pulled out some of my paper that I have that retired a year ago. It may be retired - but I still love it!
The stamp set used in this one is Eat Cake (love it). The colors in this one are so bright - sometimes I don't think about how fun bright colors are until after I put them all together.
I hope to have more time and chances to stamp this next week than I did last week - my husband and I adopted a puppy a week ago and he is a lot of work! Happy Stamping!
Friday, April 13, 2007
Delight in Life!
Mainly because I wasn't overly impressed with the cards that I posted yesterday I had to make one that I felt was really cute to make up for it. But I ran out of time and wasn't able to post it until today. I just wanted my top post to have a card that I thought was really cute - don't get me wrong though - I think the ones I posted yesterday look nice enough in person - but after scanning them in they don't look nearly as nice. :( Oh well! I can't always make something that I think looks like a masterpiece, right? So - here it is :)
The recipe for this card was super simple:
Stamps: Delight in Life (Sell-a-bration 2007)
Paper: Whisper White, Cameo Coral and Lavendar Lace cardstock
Ink: Black Stazon and Classic cameo coral
Accessories: Watercolor crayons (yoyo yellow, cameo coral and lovely lilac), a large flower eyelet (leftover from the Spring mini a year ago!) and an aquapainter
I really haven't used my water color crayons that much, but when I do I love them!!!
Thursday, April 12, 2007
First try at a new technique
I went to a Stampin' Up! seminar a couple months ago and they taught us all kinds of new stuff - some of which I am just getting around to trying out myself.
So the supplies for one of these techniques are: Mulberry paper, Glossy White cardstock, stamp of your choice, VersaMark, white embossing powder, a cotton ball, rubbing alcohol and some reinkers. You rip or cut the mulberry paper the size you want - I ripped mine the width of a jumbo roller stamp and the length of my card. Then I inked my roller stamp (Petals - love it!) with the Versa mark and rolled it over my mulberry paper. The next step is to use the white embossing powder to emboss the image onto the Mulberry paper. Make sure to heat the EP just until it melts - you don't want to scorch the paper!
Once the embossing is done - lay the mulberry paper over the glossy white cardstock (cut to size). Wet the cotton ball with the rubbing alcohol and then put 2-3 drops each of 2 or three colors of reinkers onto the cotton ball. (You might have to play around to find some that work well together - the rest time I put purple, pink and yellow together thinking they would be great spring colors, but the result was not pretty!) Next, gently dab the color from the cotton ball over the mulberry paper, the ink will not cover the embossed image and the ink will go through the mulberry paper to your glossy cardstock. Once the mulberry paper is fully covered, remove the mulberry paper and continue to blend the color over the glossy cardstock with the cotton ball until fully covered.
Once they are both dry - you have two items to use for two different cards. The colors turn out really interesting - for my samples here I used the reinkers mellow moss, certainly celery and brocade blue. Once I was done - the color on my mulberry paper was far darker than on my glossy cardstock. So much so, that to make a card using the embossed mulberry paper, I used old olive and not quite navy cadrstock. I also used some more of those really cute flower brads that I got at my local Michael's craft store - but they turned out looking black when I scanned the card - they are really pewter colored.
It is interesting to see how much lighter the glossy cardstock turned out for my next card - here I used cardstock colors that match the reinkers I used - Mellow Moss and Brocade Blue.
It doesn't look nearly as nice as the examples that they showed at my seminar - but it was my first try, right?
Thursday, April 5, 2007
A Girl Bunny :)
I know, I know. I should have been writing an exam today. I am about a third of the way done with it, but I just couldn't resist! I had made the boy bunny and now I just had to make his sister. I can't decide which one I like better. I scanned her in before I drew her whiskers, but she has them now. She is all ready for Easter to come on Sunday!
Tuesday, April 3, 2007
More Easter Fun!
I had so much fun making the Easter Basket card that I posted yesterday that I just had to try to make this Easter Bunny that I had seen a few different places! Just like the card with the basket I only used one stamp on this card, so there would be little white dots all over the background of the card. The Bunny himself is made completely from punches and a marker to draw the whiskers and teeth.
The bunny ears were punched with the Large Oval Punch, and the inside of the ears with the Small Oval Punch (and I used Designer Paper to make it look cute). The head of the bunny was punched out with the 1-3/8-inch Circle Punch. The bunny cheeks are 2 separate punches with a 1/2-inch Circle Punch (and I sponged a little bashful blue ink on the edges so they stand out). The nose was punched with the 1/4-inch Circle Punch out of the same paper I used for the inside of the ears. The teeth were made with a 1/4-inch Square Punch and I drew a line down the middle so it looked like 2 teeth.
The hardest part about this card were the eyes. They are 1/8-inch circles that I punched from a handheld punch. They are super small, so it was a little difficult to get the adhesive on the back of them so they would stick!
I made the scalloped edge by using the Slit Punch 7 times right in a row. The patterned paper at the bottom is the pattern on the back of the Designer Paper that I used for the inside of the ears.
As I said before, I had seen this bunny a few places before but everytime I saw it the bunny had pink ears and many times a pink bow in its hair. I just kept thinking - the Easter Bunny is not a girl bunny so I had to make this one that is clearly a boy bunny.
Monday, April 2, 2007
Say it With Stamps!
The promotion that Stampin' Up! is doing for the month of April is a 20% discount on a choice of 6 different stamp sets - 5 of which are greeting sets and one is an alphabet set. Here is the list of what you can get (click on image to see list larger):
The highlights of this special are - there is NO minimum purchase requirement to get the discount on these sets and there is NO limit on how many discounted sets you can buy.
Also - the stamp sets Tiny Talk and All-Year Cheer II are on this list to be purchased at a discount and they will be retiring soon - this means that after June 30th you will not be able to buy these sets. If you have been wanting them - now is the time to get them!
Here are a couple samples that use these sets - one uses Everyday Flexible Phrases, the other uses In My Thoughts. Let me know if you have any questions!
Easter Fun
To celebrate Easter, I cased a card that I saw on someone else's site and made just a couple changes. This card is neat because although it does use the Petals jumbo roller stamp and another stamp from the Polka Dots & Paisley stamp set (both available in the Spring Mini), the whole focus of the card is the easter basket which is made entirely out of punches. I could have not stamped a thing and still had a super cute card!
The base of the basket is made from the Round Tab Punch (also available in the Spring Mini). The top band of the basket is also made with 2 punches of only the top rounded portion of the Round Tab Punch. The basket handle was made by first punching out an oval with the Small Oval Punch, then with the Large Oval Punch. The three eggs were punched with the Small Oval Punch.
I also used the Slit Punch on the side so there would be a little tab to keep the card closed and I punched out a little pink circle with the 1/2-inch Circle Punch that I put over this tab.
And as if the card wasn't cute enough - I added a button for accent over my 1/2-inch circle and this really cute flower brad that I got at my local Michaels.
Subscribe to:
Posts (Atom)